
SSH Keys
SSH keys are registered to a workspace and get copied to new instances. Everyone in the workspace can use them. Each key shows who uploaded it.
Adding a key
Section titled “Adding a key”- Head over to your workspace’s “SSH Keys” page, under “Security” in the sidebar
- Hit “Upload SSH Key”
- Give the key a name
- Paste the public key
- Hit “Save”
We accept one OpenSSH public key line of type Ed25519, RSA, ECDSA, or a hardware-backed sk- key.
When keys reach an instance
Section titled “When keys reach an instance”| When | What happens |
|---|---|
| Instance is created | It receives all of the workspace’s keys for root |
| Instance is reinstalled | It receives all of the workspace’s keys again |
| You add or delete a key | Existing servers do not change until you sync them |
We install the keys through cloud-init. A custom template needs cloud-init to receive them.
Syncing keys to an existing server
Section titled “Syncing keys to an existing server”- Head over to the instance list and open your instance
- Hit “Sync SSH Keys” in the “Advanced” menu
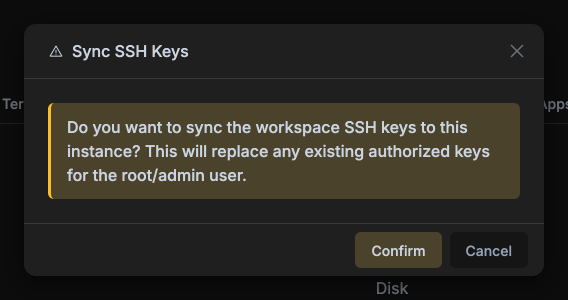
- Hit “Confirm”
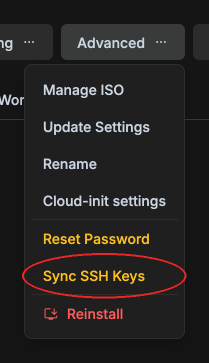
The server must be running and does not reboot. Sync works on Linux and BSD servers only and requires a working guest-agent on the instance.
Removing access
Section titled “Removing access”Deleting a key from “SSH Keys” does not remove it from servers.
- Head over to your workspace’s “SSH Keys” page, under “Security” in the sidebar
- Delete the key
- Sync each server that had it
Disabling password login
Section titled “Disabling password login”Before you turn it on, check that you can log in with a key. If you lock yourself out, use the Terminal tab.
- Head over to your workspace’s “Settings” page in the sidebar
- Under “Security”, turn on “Disable SSH password authentication on key sync”
New servers, reinstalls and every sync then turn off SSH password login for servers with keys.